Get your Proof of Address Control with Cryptnox

When an exchange, bank or auditor asks you to prove that a blockchain address is yours, Cryptnox Wallet generates a signed, sealed PDF certificate that says so — issued by Cryptnox SA, bound to a government-ID check and to a signature only your card can produce. No test transaction, and no funds move. It takes about five minutes.

What you receive

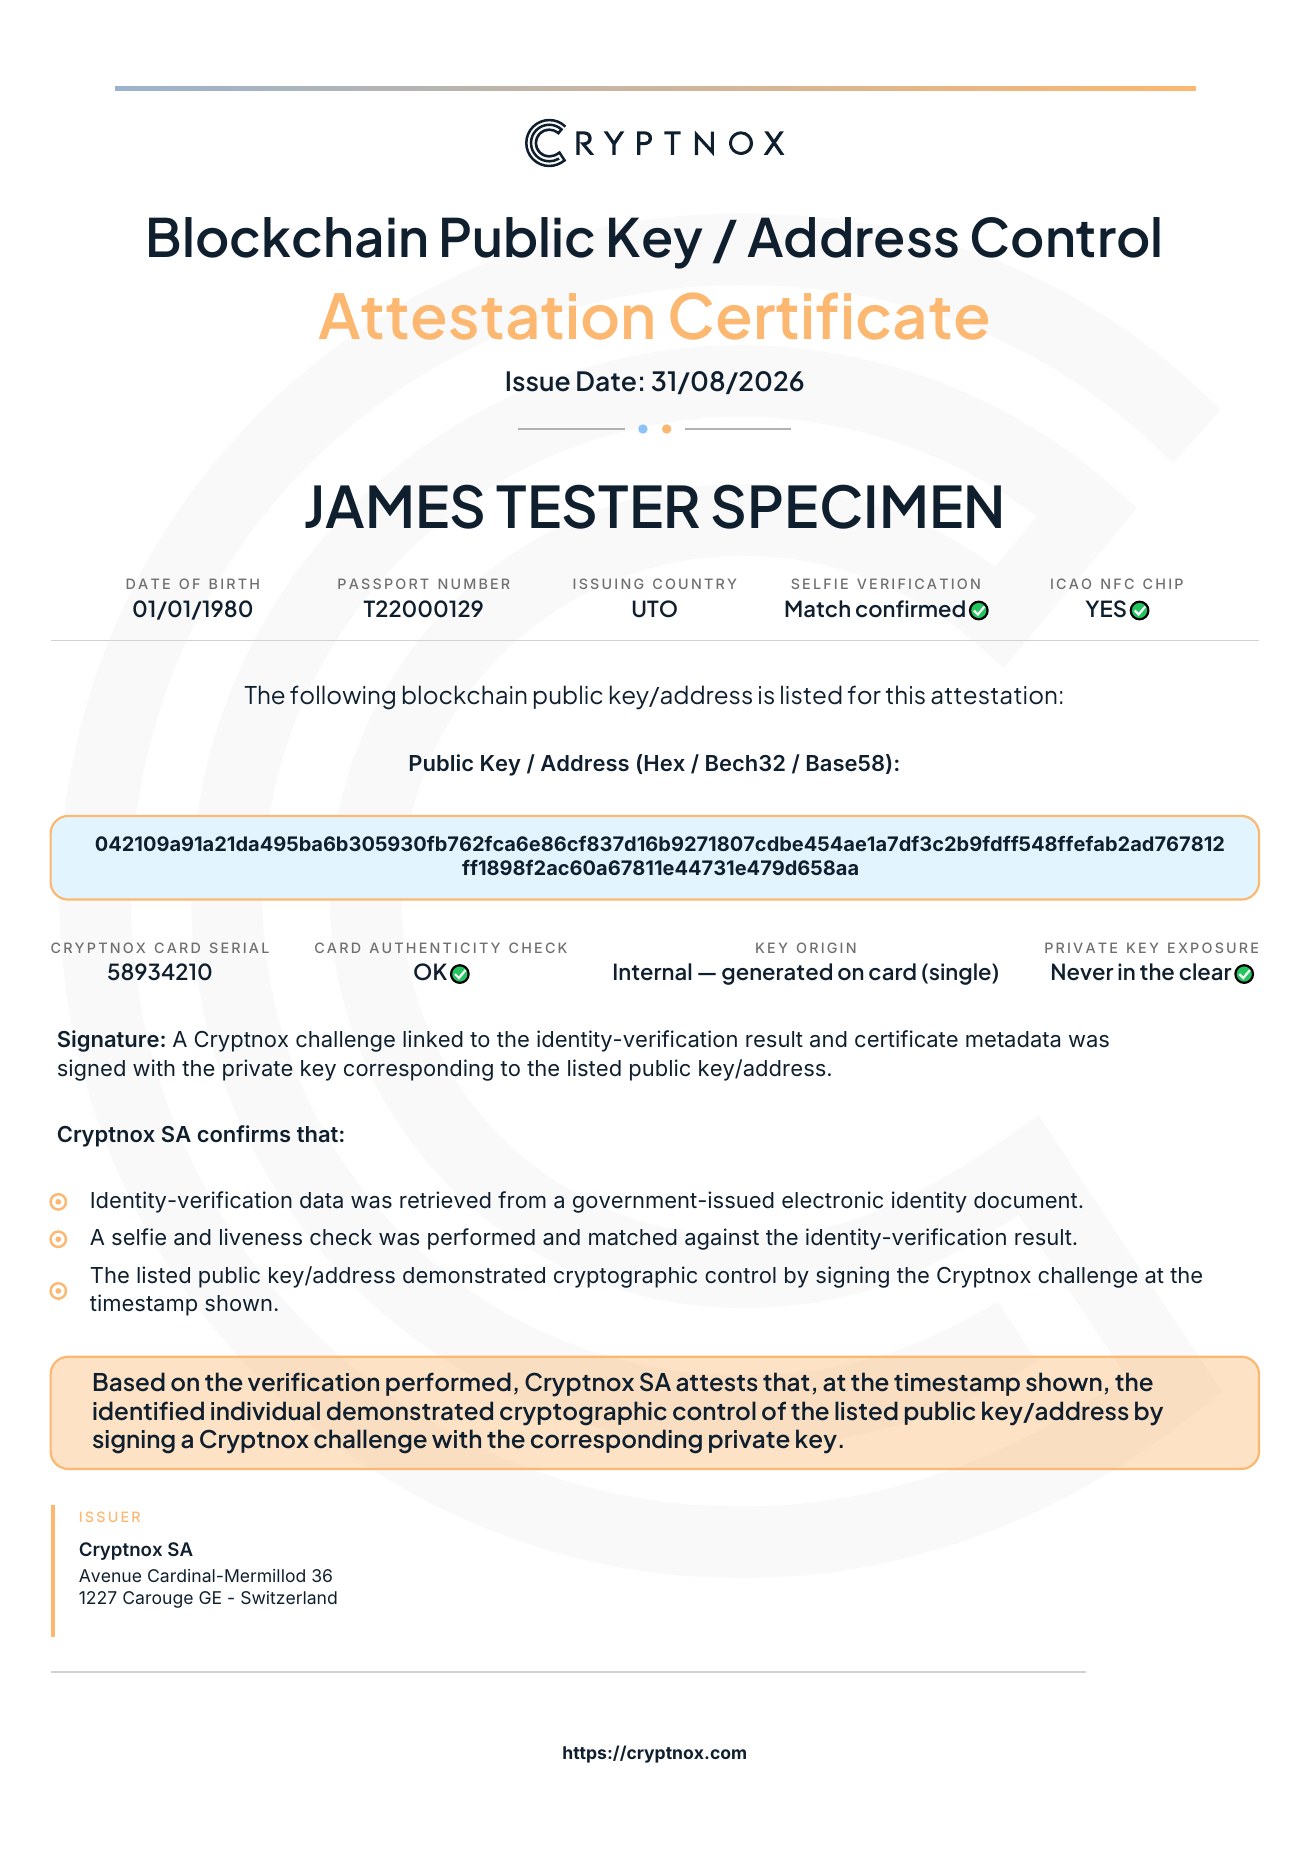
Page 1 of a sample Cryptnox Blockchain Public Key / Address Control Attestation Certificate, showing the verified identity, the attested blockchain public key, the signing card details and the attestation statement Page 1 of the certificate. Tap to open the full three-page sample. Download certificate sample (PDF)

A Blockchain Public Key / Address Control Attestation Certificate — a three-page PDF issued and electronically sealed by Cryptnox SA.

It records that you completed Cryptnox's identity-verification process and that, at the timestamp shown, you demonstrated cryptographic control of the blockchain address listed — by signing a Cryptnox challenge with the private key held on your card.

  • Identity data read from a government-issued electronic identity document
  • A selfie and liveness check, matched against that identity
  • A signature proving control of the listed address, produced inside the card
  • The serial and authenticity result of the card that signed, and where its key came from

Page 1 carries the attestation itself. Pages 2 and 3 carry the Terms, Scope and Reliance Notice, and the electronic seal. It records that verification event at a moment in time. It is not evidence of legal ownership, of continued control afterwards, or of the balance or status of any asset.

What the technical fields mean

Most of the certificate reads for itself — name, date of birth, document number, issue date. These are the fields that are worth a word of explanation. The values shown are the ones printed on the sample above.

ICAO NFC Chip YES

Whether the contactless chip inside your passport was read over NFC and its data verified. YES means the identity data came from the chip itself — which is what lets the certificate state that the data was retrieved from a government-issued electronic identity document. The step is optional in the app, and not every document carries a readable chip, but skipping it produces a weaker attestation.

Public Key / Address (Hex / Bech32 / Base58) 042109a91a21da495ba6b305930fb762fca6e86cf837d16b9271807cdbe454ae1a7df3c2b9fdff548ffefab2ad767812ff1898f2ac60a67811e44731e479d658aa

The one blockchain public key or address the certificate covers, printed in full so a relying party can compare it character by character against the one they asked you about. It appears in whichever encoding applies to the key you chose — hexadecimal for Ethereum keys as in this sample, Bech32 for Bitcoin SegWit, Base58 for other supported chains. The attestation is limited to this single key or address and says nothing about any other address you hold.

Which card signed, and where its key came from

Cryptnox Card Serial 58934210

The serial number of the individual Cryptnox card that produced the signature. It binds the attestation to one physical card.

Card Authenticity Check OK

The result of the check that the card proved itself to be a genuine Cryptnox card rather than a clone or a software emulator.

Key Origin Internal — generated on card (single)

Where the signing key came from. Internal means it was generated by the card's own certified on-chip random number generator, inside the secure element — never created on a phone or computer and then loaded in. Single records that it was generated on this one card, rather than through the paired two-card setup. A key imported from an external recovery phrase is recorded differently here, so a relying party can tell the difference.

Private Key Exposure Never in the clear

Confirms the private key was never available outside the secure element in readable form. The signature is produced on the card; the key itself does not leave it.

How it works

You can stop at any point, but nothing is kept half-finished — if you leave the flow you start again from the beginning. Set aside five uninterrupted minutes.

What you'll need
  • Your Cryptnox card already added to Cryptnox Wallet
  • A passport or supported identity document
  • An NFC-enabled phone
  • NFC enabled in your phone's settings
  • Good lighting for the document scan and selfie
  • Around five uninterrupted minutes
Approximately 5 minutes
1
Scan ID
2
Confirm details
3
Verify passport chip — Optional
4
Complete liveness check
5
Choose blockchain key
6
Sign with Cryptnox card
7
Submit
Note The screenshots in this guide use a demonstration passport (a fictional "Utopia" specimen document) and a stand-in portrait. Your own screens will show your details.

Step-by-step: Cryptnox Wallet identity verification

What's happening technically

Cryptnox Wallet identity verification combines document capture, an optional ePassport NFC read, a selfie liveness check, and a digital signature created with a blockchain key held by your Cryptnox card. The blockchain address you select identifies which key produced the signature — your private key stays on the card throughout.

1

Open Identity in Cryptnox Wallet

On the Portfolio screen, tap Tools in the bottom bar. A short menu opens — tap Identity.
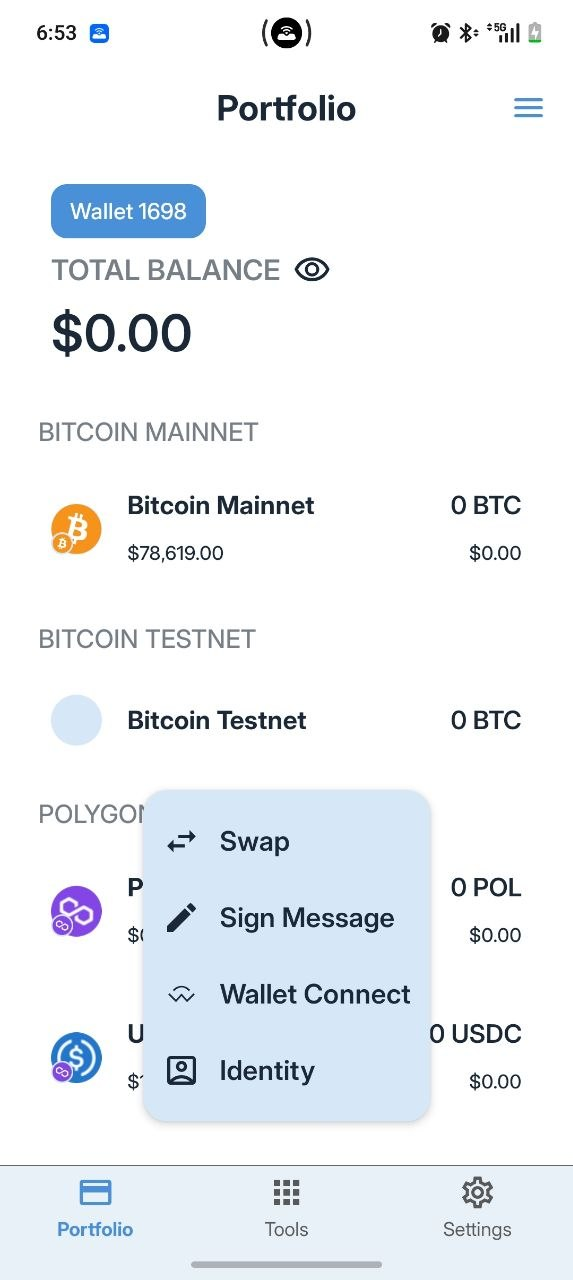
Your Cryptnox card needs to be added first, under Settings → Cards. The same Tools menu holds Swap, Sign Message and Wallet Connect — Identity is the last item in the list.
Cryptnox Wallet Tools menu with the Identity option highlighted
Tools menu, with Identity
2

Start your identity verification

The welcome screen lists the four things that will happen: you capture your photo ID, take a selfie, sign with your Cryptnox card, and submit the verification for processing.

Tap Get Started. Exit returns you to your portfolio without starting.
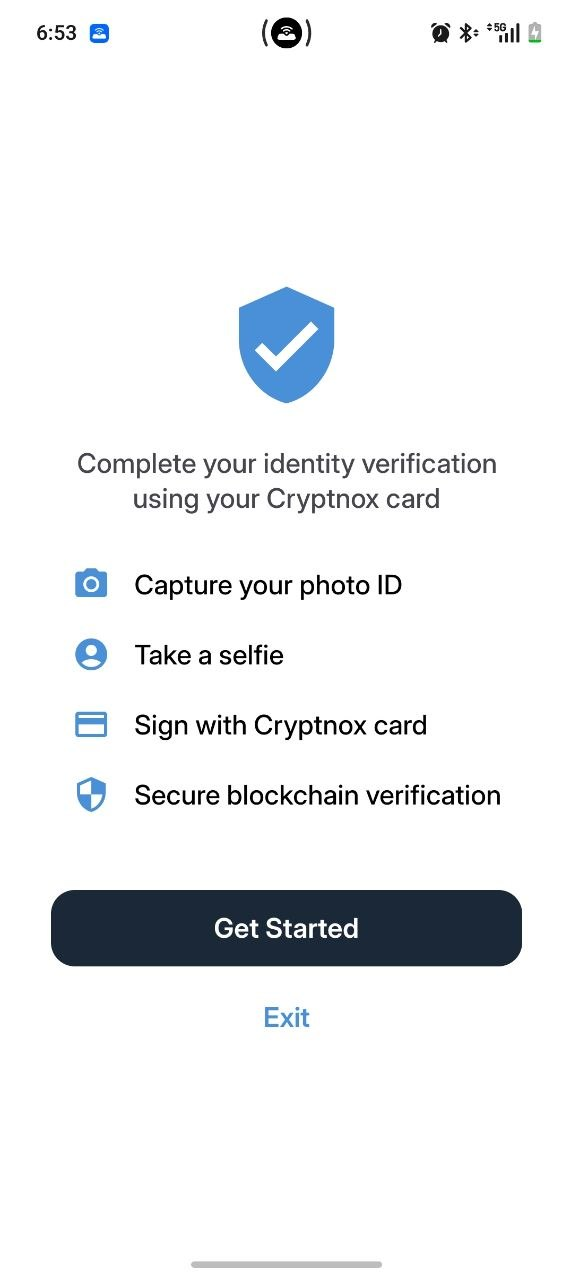
Cryptnox Wallet identity verification welcome screen
Welcome screen
3

Enter your email address

Type an address you can actually open. It's associated with your verification and is how you'll be contacted about it.

Tap Continue.
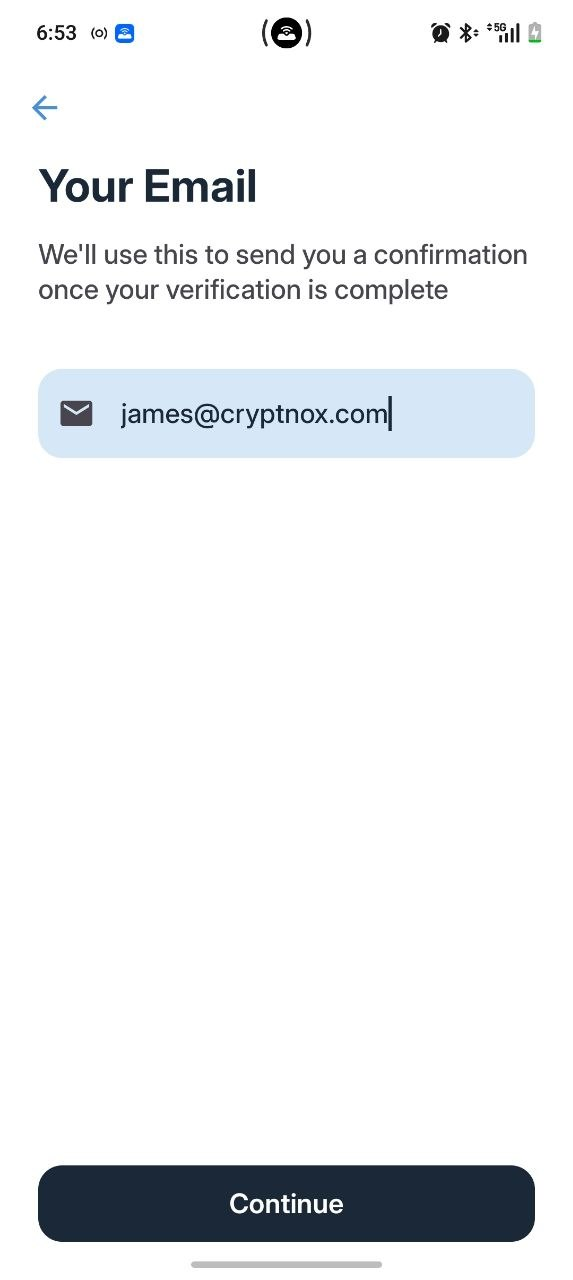
Entering an email address for Cryptnox Wallet identity verification
Your email
4

Scan your passport or identity document

Lay the document flat and open at the photo page, on a plain surface in even light. Hold the phone above it so the page fills the frame, with all four edges inside.

Auto Capture takes the picture as soon as the page is steady and in focus. Manual waits for you to tap the shutter — use it if auto capture keeps missing.
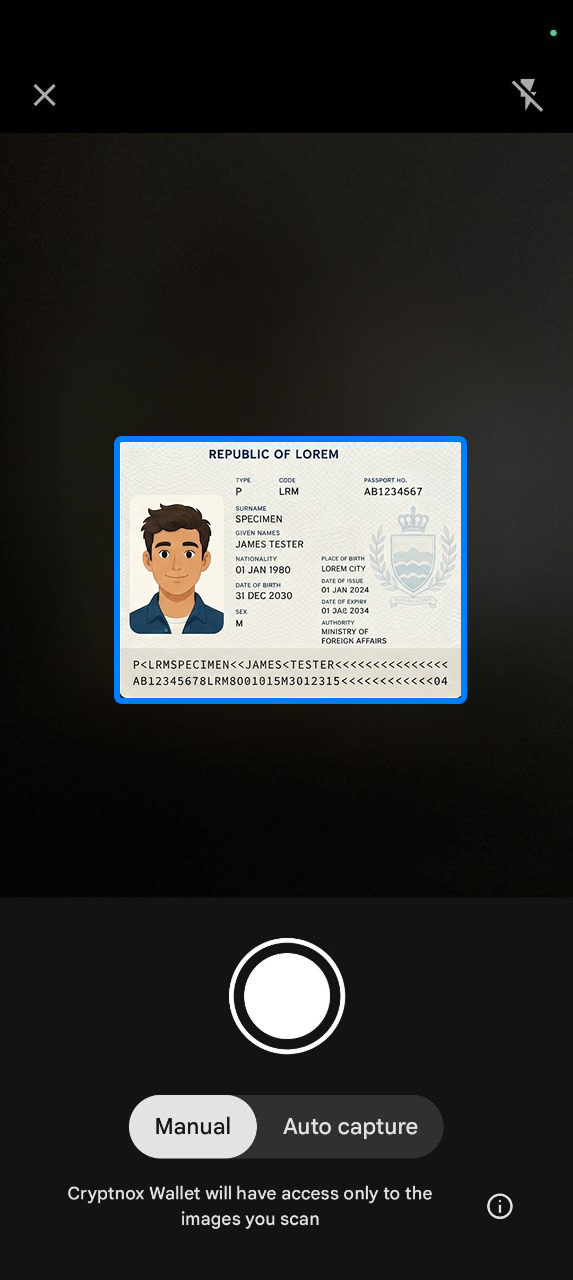
Tip Avoid glare: tilt the document slightly away from a lamp or window instead of photographing straight into a reflection.
Scanning a passport for identity verification in Cryptnox Wallet
Page filling the frame
5

Review and confirm your details

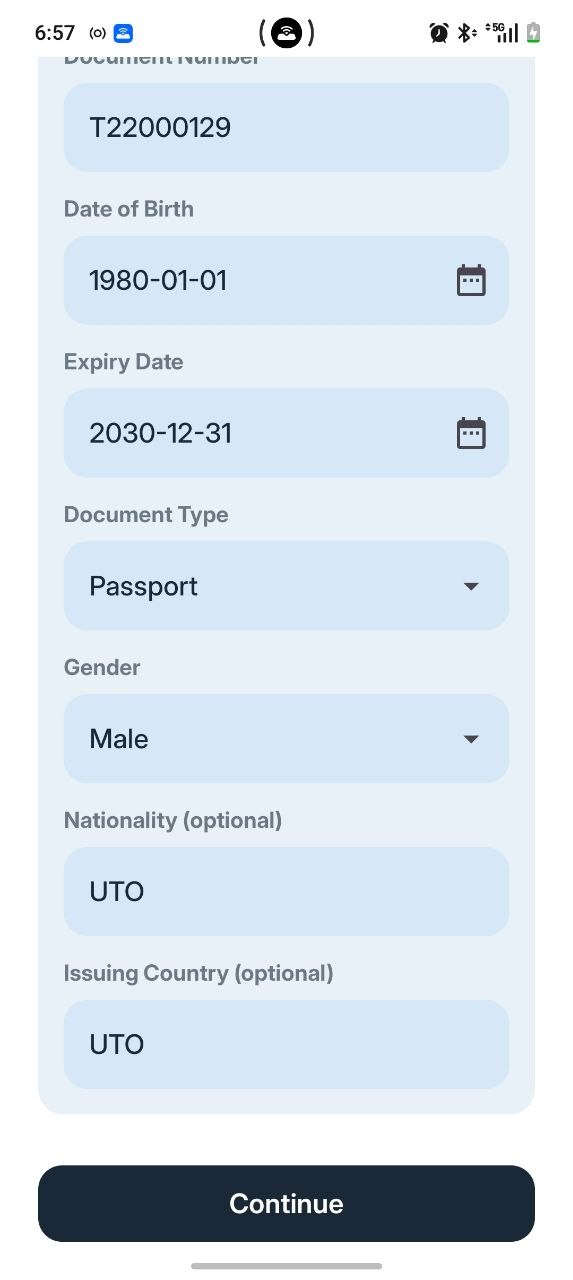
Cryptnox Wallet reads the details off the document and pre-fills the form — first and last name, document number, date of birth, expiry date, document type, gender, nationality and issuing country. Go through them and correct anything that was read wrong.

Nationality and issuing country are optional. Tap Continue.
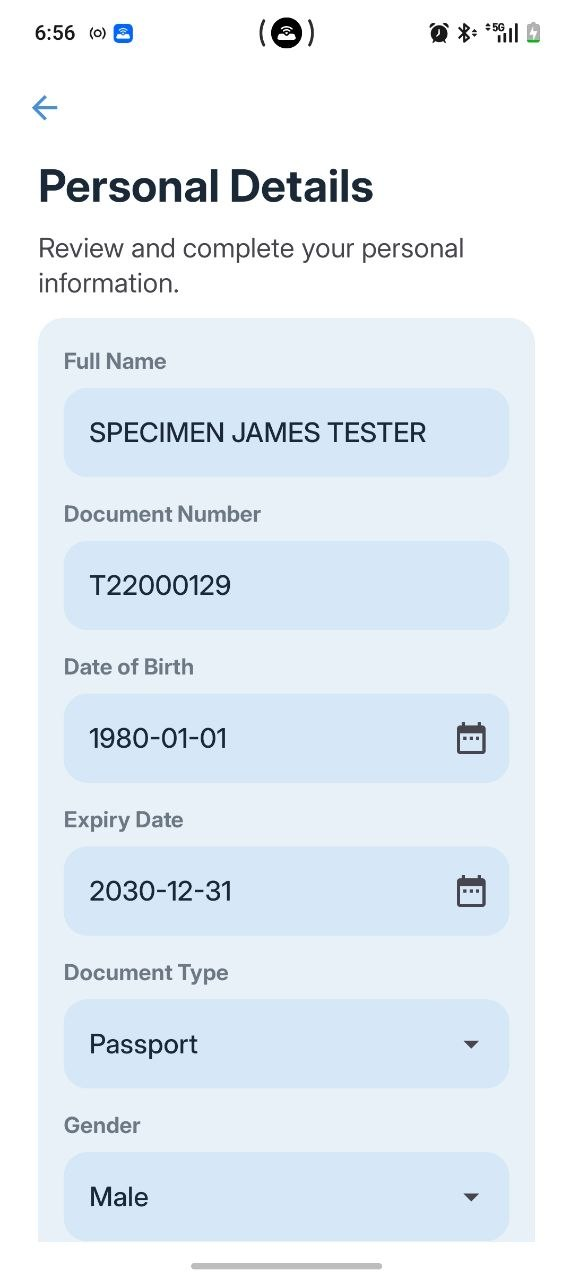
Important Don't change the document number, date of birth or expiry date unless the information was incorrectly read — these details are used to access the passport chip in the next step.
Reviewing name, document number and dates in Cryptnox Wallet identity verification
Name, number, dates
Reviewing document type, gender and country in Cryptnox Wallet identity verification
Type, gender, country
6

Verify the ePassport chip

Optional but recommended

Many modern passports carry an NFC chip containing cryptographically protected document and biometric information. Reading it is one of the strongest checks the flow can make — it isn't guaranteed to be present on every ID card.

Tap Scan Passport, then hold the phone flat against the passport cover and keep both still while the chip is read. The step can be skipped, and not every ID card contains a readable chip.

Without chip verification With successful chip verification
Document image and extracted details Additional cryptographic document checks
Verification can continue Enhanced document authenticity evidence

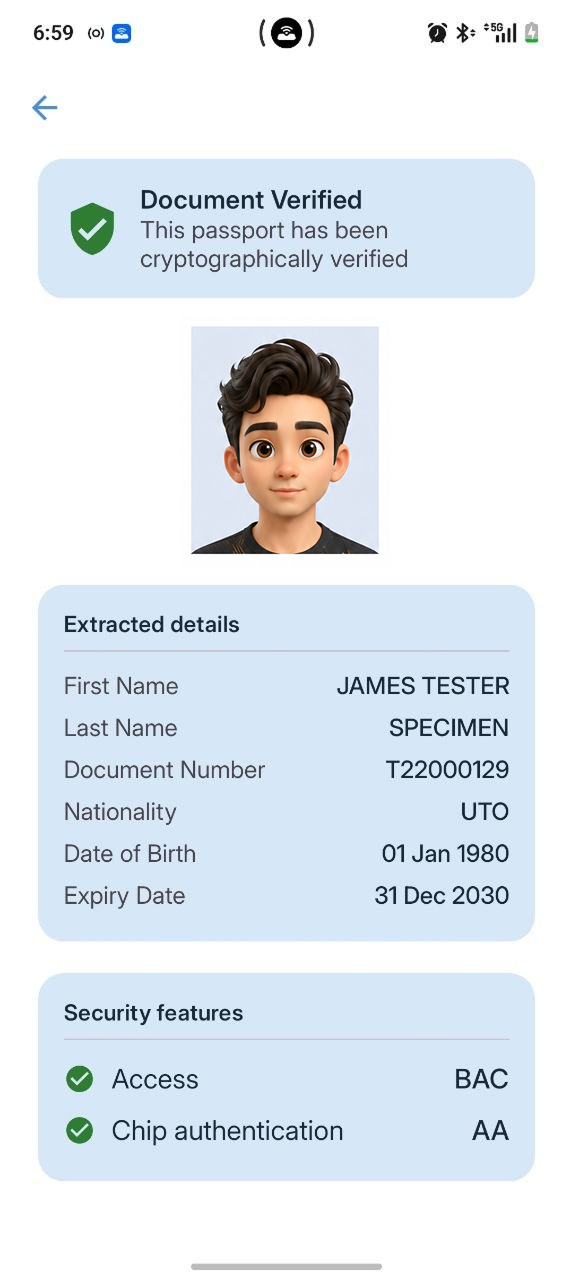
When the read succeeds you'll see Document Verified, the photo stored on the chip, and which security checks passed. Tap Continue.
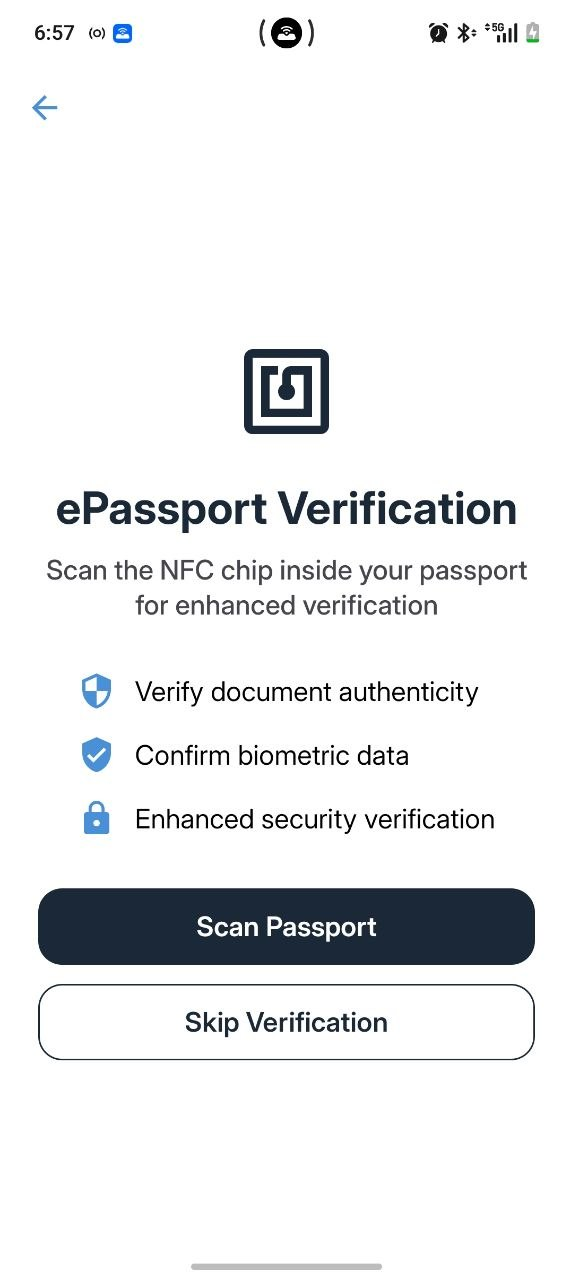
Optional ePassport NFC chip verification screen in Cryptnox Wallet
Scan or skip
Document Verified result after ePassport chip verification in Cryptnox Wallet
Document verified
7

Complete the selfie and liveness check

Hold the phone at eye level, in even light, and fit your face inside the oval. Slowly turn your head as instructed, returning to centre between movements.
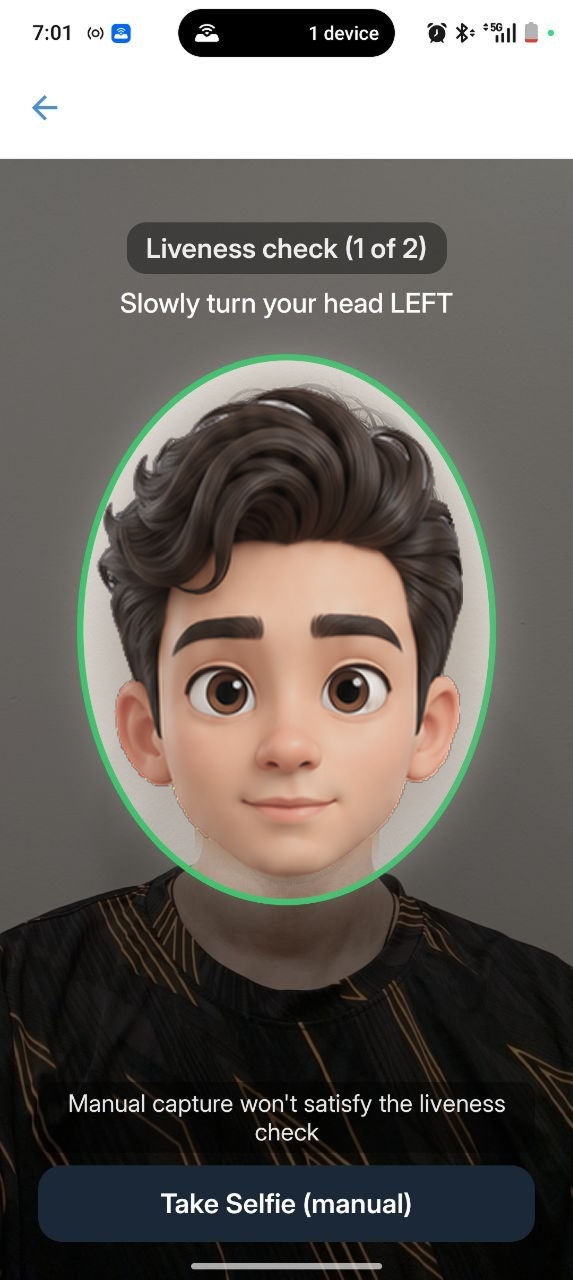
A manually captured selfie may take a photo, but it doesn't necessarily satisfy the active liveness check — the head-turn sequence is what confirms a real person is in front of the camera.
Active liveness selfie check in Cryptnox Wallet identity verification
Active liveness check
8

Choose the blockchain key that will sign your verification

Your card holds several blockchain keys — Bitcoin SegWit, Ethereum, TRON or XRP. Pick the one that should sign your verification.

Note Selecting a key does not move cryptocurrency or authorise a transaction. It only determines which blockchain address and cryptographic key will be associated with the verification signature.

If you have no preference, Ethereum is a sensible default. Tap Continue.
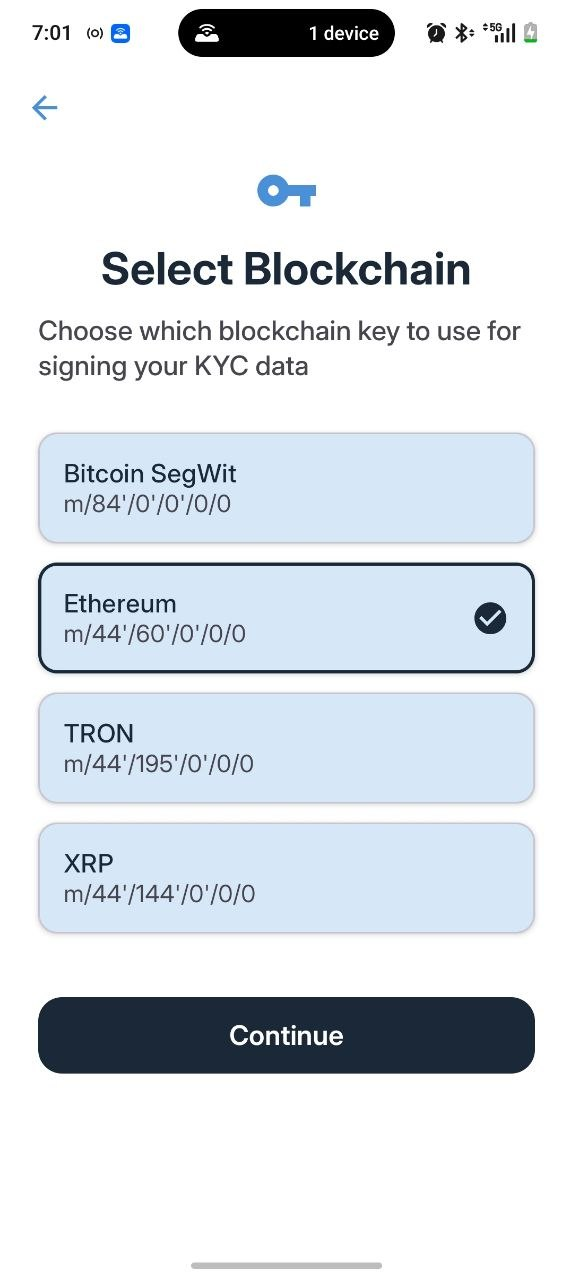
Choosing a blockchain key to sign identity verification in Cryptnox Wallet
Select blockchain
9

Sign with your Cryptnox card

Tap Start Scanning, then hold your card flat against the back of your phone, over the NFC area. Keep it still while the signature is created.

The wallet shows Card Connected and then Signing…. If it drops out, hold the card again and let it retry.
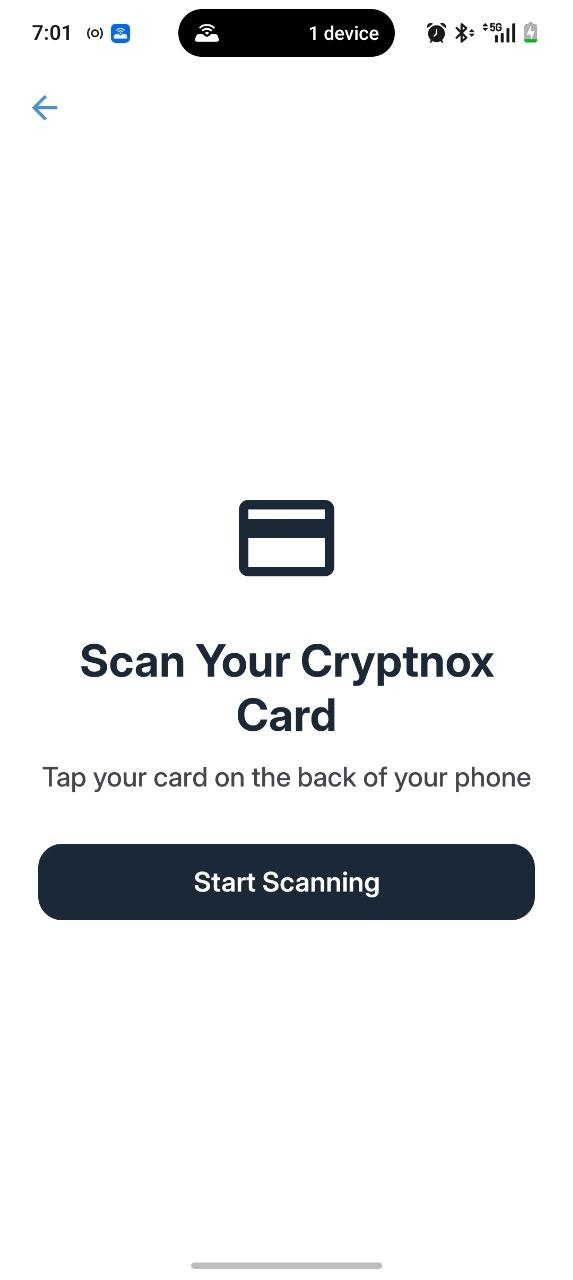
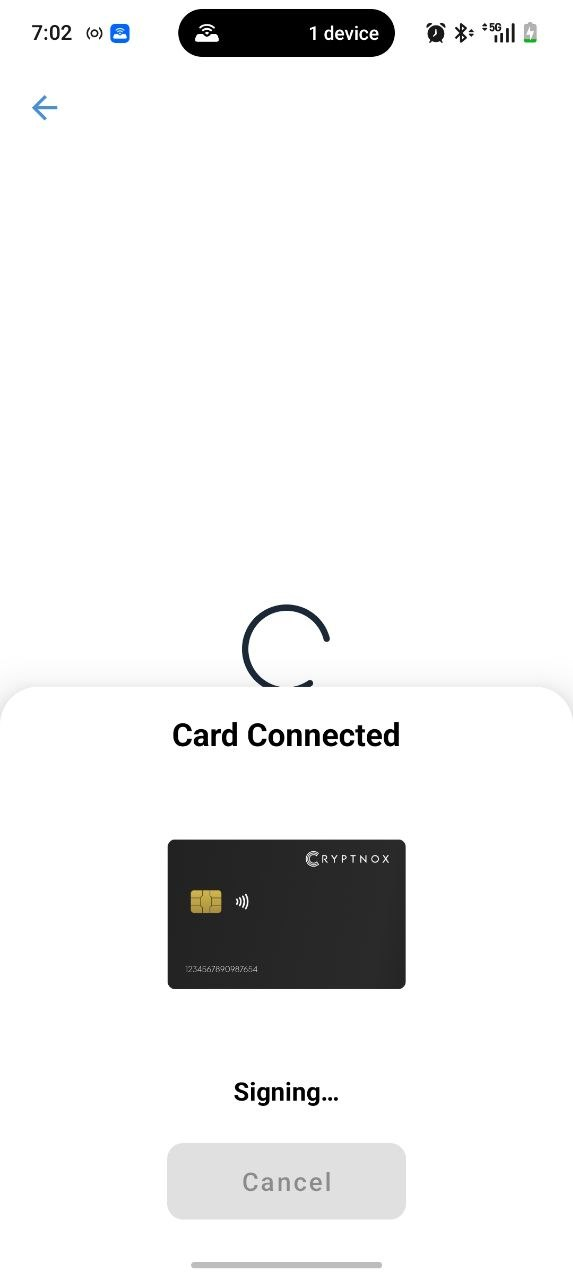
Security The signature is produced using cryptographic material held by the Cryptnox card. The private key does not need to be exposed to the phone or transferred as part of the verification process.
Cryptnox card connected to an NFC phone for digital signing
Tap the card to the phone
Cryptnox Wallet signing an identity verification with the Cryptnox card
Card connected, signing
10

Review and submit your verification

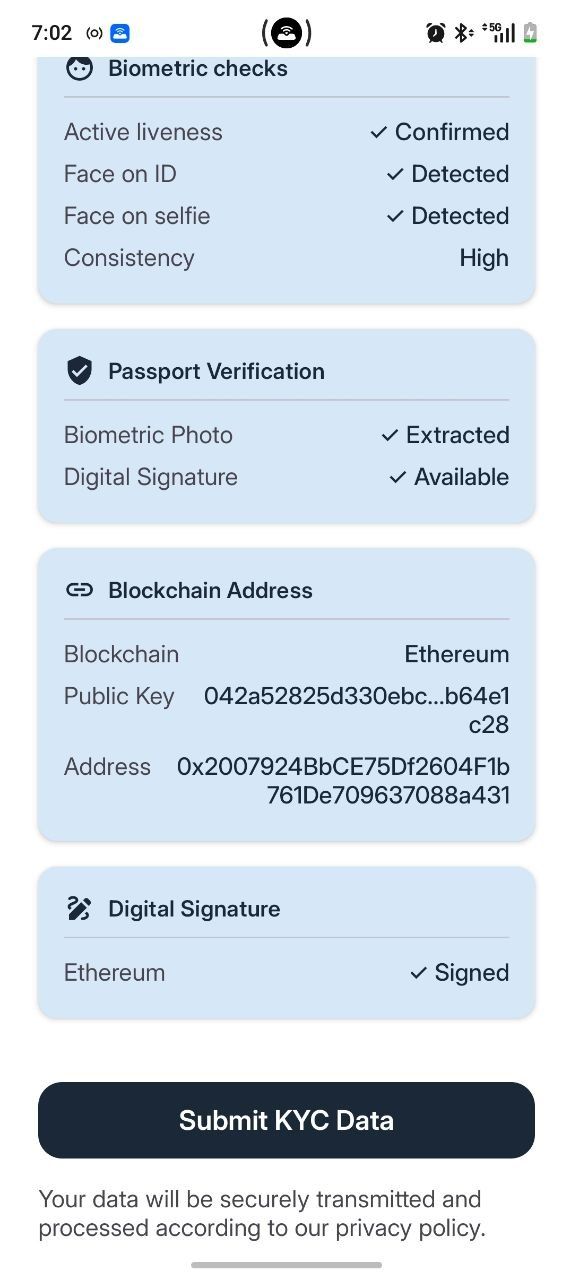
The review screen shows everything before it's sent: the document image, your confirmed details, the biometric and liveness results, document security checks, the selected blockchain address, and the digital signature.

Read it through, then tap Submit KYC Data.
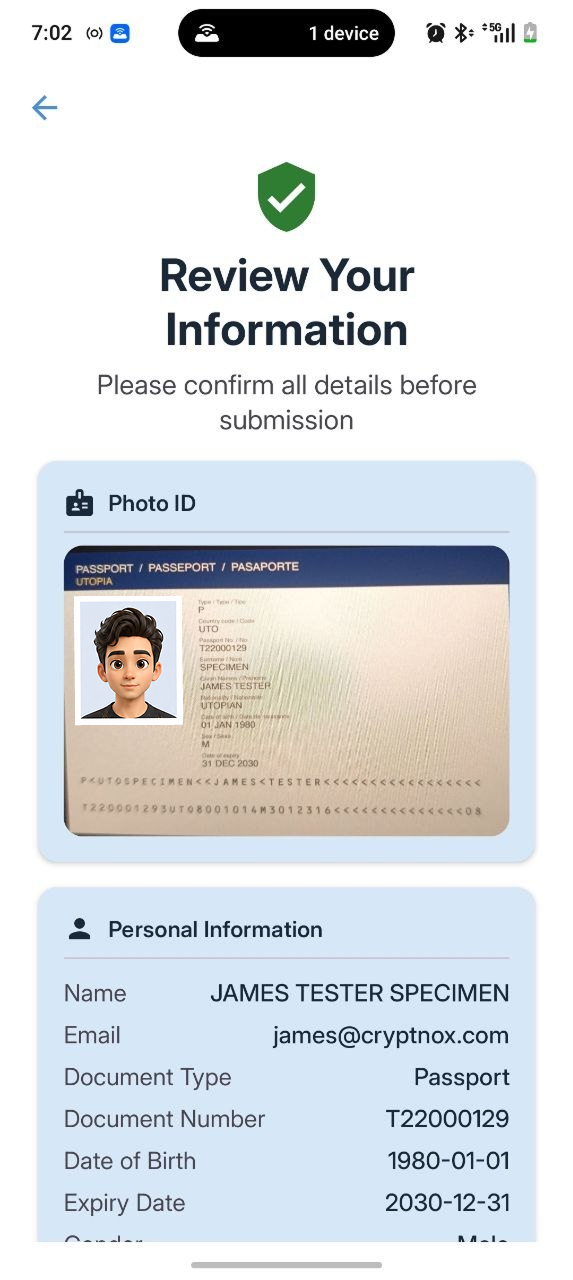
Reviewing photo ID and details before submitting Cryptnox Wallet identity verification
Photo ID and details
Reviewing checks, blockchain address and signature before submitting in Cryptnox Wallet
Checks, address, submit
11

Verification submitted

Verification Submitted confirms the submission has been sent and signed with your Cryptnox card's selected key.

Tap Done to return to your portfolio. If a submission is rejected instead, the wallet explains why — the most common reasons are covered below.
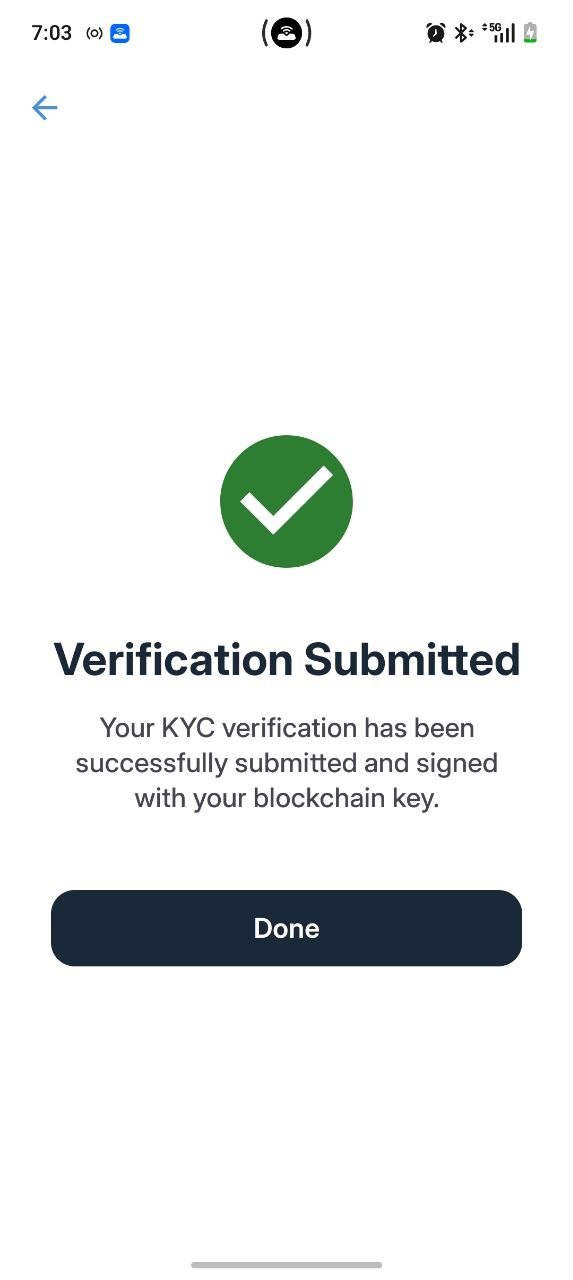
Verification Submitted confirmation in Cryptnox Wallet
Verification submitted

Troubleshooting Cryptnox Wallet identity verification

If something goes wrong along the way, here's how to fix it.

"Verification Incomplete" after the chip read

The chip answered, but not every security check passed. You can carry on — the remaining checks are completed after you submit. Or tap Rescan and try again with the passport out of its cover and lying flat.

The passport chip cannot be read

Remove the passport from its cover, take off any phone case or metal accessory that could interfere with NFC, and move the phone slowly across the back cover to locate the chip. Keep the phone still once communication begins.

My document will not scan

Add light, reduce glare, and make sure all four edges of the page are inside the frame. If Auto Capture keeps missing, switch to Manual and tap the shutter yourself.

The liveness check does not complete

Turn your head further and more slowly, and return to the centre between the two turns. Keep your whole face inside the oval, eyes open, and avoid strong backlighting.

My Cryptnox card is not recognised

The card has to be added to the wallet before it can sign: Settings → Cards. Then start the Identity flow again.

The camera remains black

Camera access is required. Allow it when the phone asks, or if you refused earlier, turn it on in your phone's app permission settings for Cryptnox Wallet.
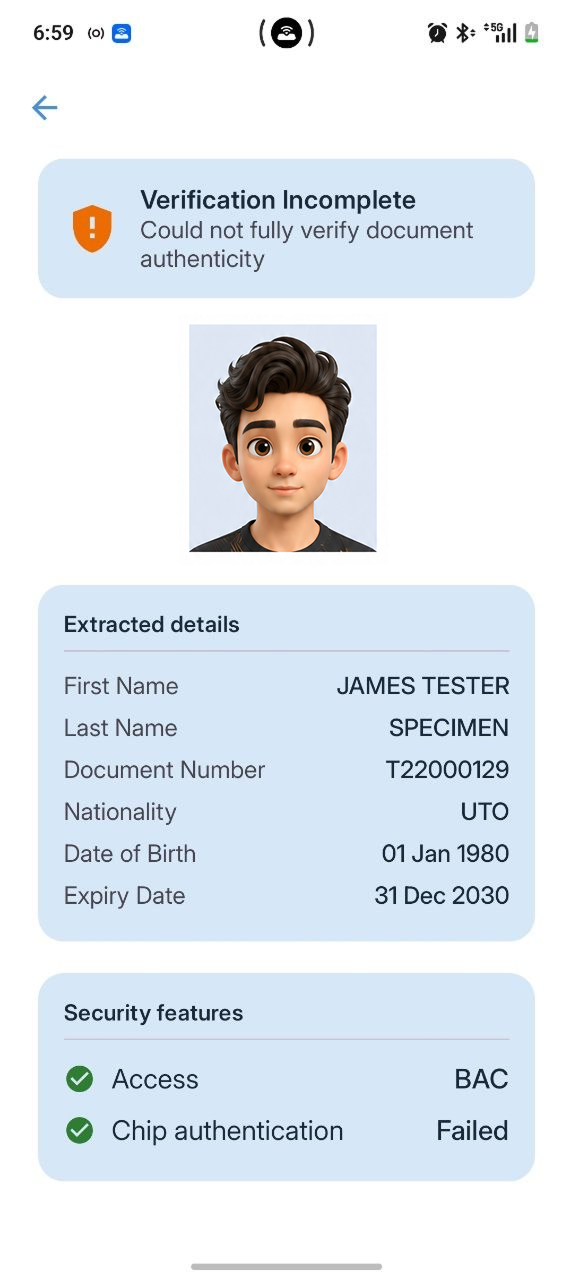
Verification Incomplete result after ePassport chip read in Cryptnox Wallet
"Verification Incomplete" — you can continue or rescan

Frequently Asked Questions

What is Cryptnox Wallet identity verification?

It's a verification flow inside Cryptnox Wallet that captures your identity document, optionally reads its ePassport NFC chip, runs a selfie liveness check, and signs the result with a blockchain key held by your Cryptnox card — linking the submission to your address without exposing the private key.

Do I need to verify the NFC chip in my passport?

No, it's optional. It can be skipped, and not every identity document has a readable chip. Verifying it adds cryptographic document checks and stronger authenticity evidence, so it's recommended when your document supports it.

Does identity verification move cryptocurrency from my wallet?

No. Selecting a blockchain key only determines which address and cryptographic key sign the verification. No funds are moved and no transaction is authorised as part of this process.

Which blockchain key can sign my verification?

Cryptnox Wallet supports signing with Bitcoin SegWit, Ethereum, TRON or XRP keys held on your card. You choose which one to use before signing; Ethereum is a reasonable default if you have no preference.

Does my private key leave my Cryptnox card during verification?

No. The signature is produced using cryptographic material held inside the card. The private key does not need to be exposed to the phone or transferred as part of the verification process.

Why do I need to complete a selfie liveness check?

The liveness check — turning your head as instructed — confirms a real person is in front of the camera, rather than a photograph. A manually captured selfie alone doesn't satisfy this check.

What happens if passport chip verification is incomplete?

"Verification Incomplete" means the chip was read but not every security check passed. You can continue — the remaining checks complete after submission — or rescan with the passport out of its cover.

Can I complete identity verification with an ID card instead of a passport?

Yes. Supported ID cards can be used for document capture and the review step. Chip verification only applies if the card carries a readable NFC chip; otherwise verification continues without it.

Is this a proof of ownership?

No — and the distinction matters to whoever relies on it. The certificate attests that you demonstrated cryptographic control of the address by signing a Cryptnox challenge with its private key, at a recorded time. It is not a statement of legal ownership, and it is not evidence that you still control the address afterwards. That is precisely what makes it verifiable: control can be proven cryptographically, ownership cannot.

Is this the same as a Satoshi test?

No — they are two different methods on the same regulatory list. The EBA's Travel Rule Guidelines (EBA/GL/2024/11, paragraph 83) set out how a crypto-asset service provider should check that a self-hosted address belongs to its customer. Sending a predefined minimal amount to and from the address — the Satoshi test — is method (c). Asking the customer to digitally sign a specific message with the key corresponding to that address is method (d), and that is what Cryptnox Wallet does: you sign a Cryptnox challenge with the key held on your card. No funds move and no network fee is paid. The difference that matters is identity: methods (c) and (d) both show that someone controlled the key, not who. The Cryptnox certificate binds that signature to a government-issued identity document check and a liveness check, so the provider receives control and identity in one sealed document. Whether it accepts that evidence remains its own decision. For the full list of the five EBA methods and what each proves, read What is a Satoshi test?

Can I use this to verify a self-hosted wallet for an exchange?

That is what it is built for. Exchanges and banks increasingly ask customers to demonstrate control of a self-hosted (self-custody) address before releasing funds to it. The certificate gives them a sealed document naming the address, the verified identity and the time of verification. Whether it satisfies a particular institution's process is that institution's decision — the certificate states its own scope, and reliance is theirs to assess.